Integrate Instagram Basic Display API with Node.js
2021 Jul 29 - 4 min read

This article will demonstrate how Instagram can be integrated with your system. Specifically, it explores a mechanism to show users’ Instagram posts on your app/website.
At time of writing this article, instafeed.js provides similar functionality. However, it depends on Heroku’s free service to refresh tokens. After Heroku updated its pricing policy, it kind of became expensive. This approach serves as self-hosted alternative.
Before going further, please head over to Facebook Developers page and go through the overview. It will be easier to grasp concepts further.
The overall process boils down to 4 steps:
- Create a Facebook app
- Get access tokens
- Setup token refresh service
- Fetch Data
1. Create a Facebook App
Follow steps 1 to 3 from this link.
https://developers.facebook.com/docs/instagram-basic-display-api/getting-started
2. Get Access Tokens
Proceeding further requires app-specific keys and secrets which can be found here.
App ⇒ Dashboard ⇒ My products ⇒ Instagram Basic Display ⇒ Settings
App ID is required on the frontend only; backend requires both ID & secret. Since App secret can’t be shown to users, it’s kept as an environment variable on the server.
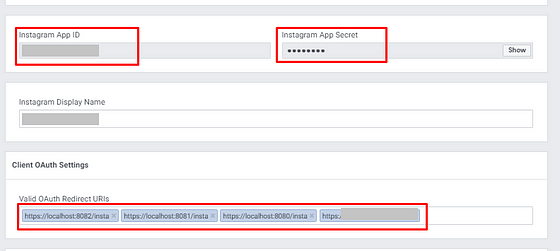
Also, add your frontend application’s URL to Valid OAuth Redirect URIs. localhost with https will work. Hosting static app on GitHub pages will do and is a better option.
Frontend
Use this piece of code on a static frontend site to get a short-lived access token. Short-lived access tokens are valid for 1 hour but can be exchanged for long-lived tokens (will do later on server-side).
Since our goal is to fetch user-related info and their Instagram photos, scopes are set to user_profile & user_media.
// Invoke this function on button click or whatever other use case
function setupInsta(){
	let appId = "XXXXXXXXXXXXXX";
	let redUri = window.location.origin + "/insta";
	let url = `https://api.instagram.com/oauth/authorize?client_id=${appId}&redirect_uri=${redUri}&scope=user_profile,user_media&response_type=code`;
	window.open(url, "_blank").focus();
}
It will open authorization window on a new tab. After being authorized it will redirect to/insta page(as configured on the above code) with a query parameter containing code. That code will be used to fetch short-lived access token on the backend.
Next, the code & redirect URI are sent to the server for further processing.
Backend
It’s assumed that the backend has an endpoint for receiving code & redirect URI via any HTTP method.
Now, the next step is to get Short-Lived-Access-Token. The code is self-explanatory.
JSON-based POST won’t work. So form based request is sent via request.
// data from frontend
let code = req.body.code;
let redirectUri = req.body.redirectUri;

let accessToken = null;
try {

    // send form based request to Instagram API
    let result = await request.post({
        url: 'https://api.instagram.com/oauth/access_token',
        form: {
            client_id: process.env.INSTA_APP_ID,
            client_secret: process.env.INSTA_APP_SECRET,
            grant_type: 'authorization_code',
            redirect_uri: req.body.redirectUri,
            code: req.body.code
        }
    });

    // Got access token. Parse string response to JSON
    accessToken = JSON.parse(result).access_token;
} catch (e) {
    console.log("Error=====", e);
}
After Short-Lived-Access-Token is obtained, it needs to be exchanged with Long-Lived-Access-Token.
  try {
    let resp = await axios.get(`https://graph.instagram.com/access_token?grant_type=ig_exchange_token&client_secret=${process.env.INSTA_APP_SECRET}&access_token=${accessToken}`)
    accessToken = resp.data.access_token;
    // save accessToken  to Database
  } catch (e) {
    console.log("Error=====", e.data);
  }
For further API calls only the Long-Lived-Access-Token is used. As mentioned earlier, short-lived token has 1 hour validity. Similarly long-lived token has 60 days validity. i.e. the token just stored on DB needs to be refreshed before it expires.
3. Setup Token Refresh Service
To refresh token every 60 days, a cron job seems suitable. node-cron will serve best for this purpose.
import cron from 'node-cron';
import instaRefreshCron from "./crons/instaRefresh.cron";

// run immediately after server starts
instaRefreshCron();

// refresh instaAccessToken eg: weekly(every Sat)
cron.schedule('* * * * * 7', async () => {
    await instaRefreshCron();
});
Inside instaRefresh.cron file, it gets old token from DB and replaces it with new one.
try {
    let oldAccessToken =  "XXXXX"; // get from DB
    let resp = await axios.get(`https://graph.instagram.com/refresh_access_token?grant_type=ig_refresh_token&access_token=${oldAccessToken}`)
    if (resp.data.access_token) {
        let newAccessToken = resp.data.access_token;
        // save newAccessToken to DB
    }
} catch (e) {
    console.log("Error=====", e.response.data);
}
Hence, this cron job will automatically refresh access tokens.
4. Fetch data
Finally, its time to fetch data from Instagram. We will be making use of the ` stored on DB. To learn more on what kinds of data can be fetched, visit this page.
Access tokens are app-scoped (unique to the app and user pair)
Here, we will be fetching media uploaded by user. Then Filter it and obtain images only.
try {
  let instaAccessToken = "XXXXXX"; // get from DB
  let resp = await axios.get(`https://graph.instagram.com/me/media?fields=media_type,permalink,media_url&access_token=${instaAccessToken}`);
  resp = resp.data;
  let instaPhotos = resp.data.filter(d => d.media_type === "IMAGE").map(d => d.media_url);
  // Got insta photos
} catch (e) {
   console.log(e.response.data.error);
}
Platform Rate Limits
Instagram API has limit on number of API calls. More details can be found here.
One way around this issue is to cache API responses. For this particular scenario, the image URLs can be saved to database every, let's say, every 3 hours; using cron-jobs.
import cron from 'node-cron';
import instaCacheCron from "./crons/instaCache.cron";

// run immediately after server starts
instaCacheCron();

// update instaPhotos Cache every 3 hours
cron.schedule('0 0 */3 * * *', async () => {
  // this method fetches updated Insta images and saves to DB.
	await instaCacheCron();
});
Instead of calling Instagram API directly, images can be served from DB; as a cache. However, this particular case may not be feasible for every use case.
I hope this guide will help to integrate Instagram Basic API on Node.js-based applications. If you have a more robust alternative, please mention in the comments below.
Thanks for reading. 🙂